Showing posts with label recipe. Show all posts

Saturday, November 10, 2012

Saturday Thrift Finds, Muffins, & Backseat Diaper Changes

There's nothing I love more than the thrill of a deal.  Add Trader Joe's Pumpkin muffins, fresh coffee, and a baby who doesn't mind having his diaper changed in the back seat and you got a perfect Saturday morning treasure hunt.  The invigorating super-hero quality of respectfully wheelin' and dealin' or the incredibly underpriced gem no one else has spotted or cared to take home - I love em' both.  All of our marriage, I have always tried to by "thrifty" in designing our home.  We have never bought anything brand new, save our IKEA bed frame costing us just one and a half Benjamin's and a few other clearance items.  My initial approach was just to pinch-pinch-pinch pennies and often times I bought things for cheap just because they were cheap.  After moving five times, I have come to love the art of "pairing down" and only buying things we love, trying to practice the phrase "All You Need Is Less." Although our home isn't exactly empty of "things" I would say there isn't an excess of "much."  Any purchase is now carefully thought through, decided and agreed upon by the both of us, and lovingly chosen.  Here are a few of my favorite things most recent finds.

Seven dollars in wooden empty & unwanted picture frames will shortly help me finish another Pinterest project.  For our five year anniversary we took a short road trip to Savannah, GA.  I noticed a few of the shops we loved to visit had uniquely designed brown paper bags that I, for some reason or another, can't ever just throw out.  I re-use them as lunch bags, cut them up to wrap a gift, or carry things from here to there.  I know, I know, what about the "needing less" philosophy? This infringes in the, frugality clause which I also abide by that states, "I paid for this when I bought something to put inside of it," so why not re-use it? So, on our next trip or the next time we discover a great brown bag, you can bet that sucker will be slapped behind a frame.  I plan to do an entire wall Young House Love style, with bags, napkins, menus, etc... all in the "brown bag" family. 
Here's a little cutie we picked up this morning - find of THE YEAR.  I can not express the joy my pitter-pattering heart boom boomed as I spotted the little green sticker reading $1.  "This can't be....seriously?  Somebody made a mistake."  Nope.  No mistake.  Just a little gold mine the elderly man selling it thought no one would want.  Dead wrong.  I love everything about it.  The shelves have a sweet doily-esque detail that you would find on the sheet metal  used to cover an old ceramic heater...  However, the sweet wire shelves under the push handles leave me curious.  Stemware?  Tea boxes?  Anyone know what they were used for?  
Here she is in her new home.  I'm swooning in all her rusty-metal-caster love.
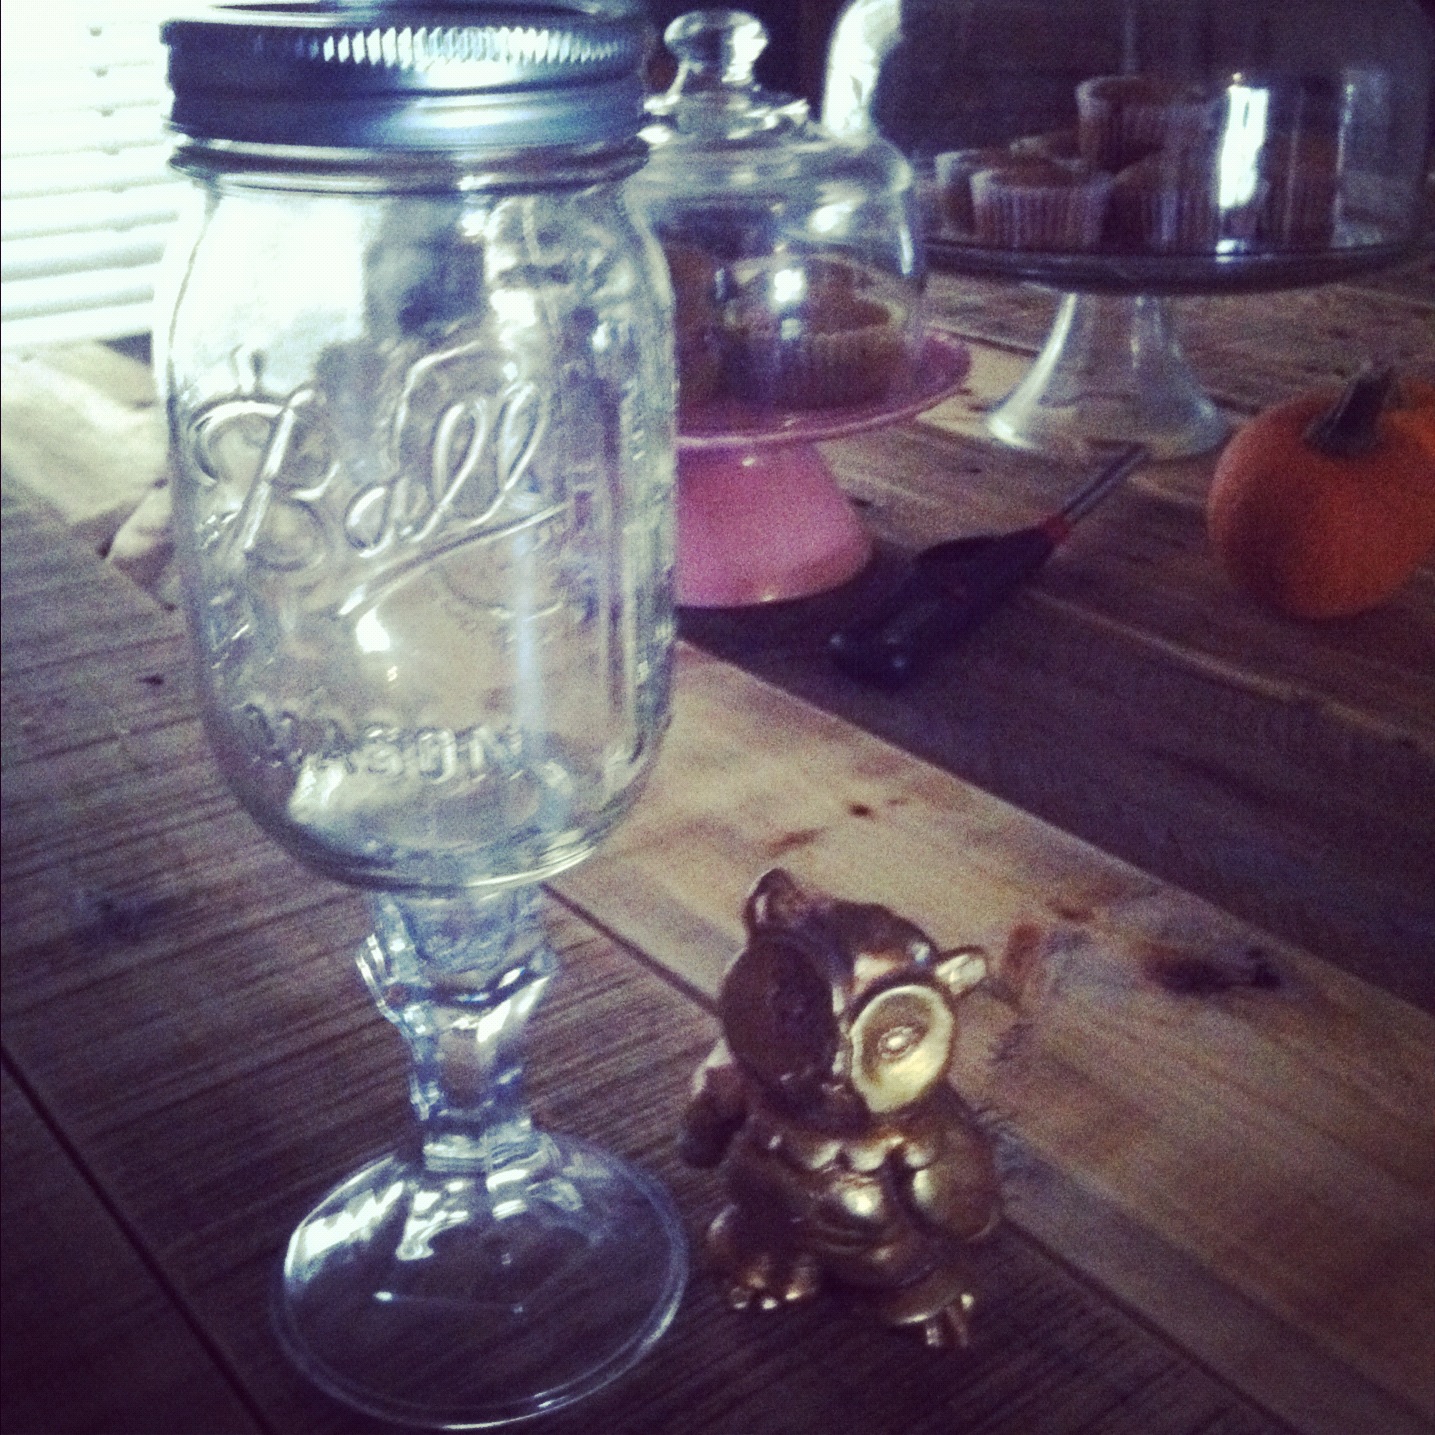
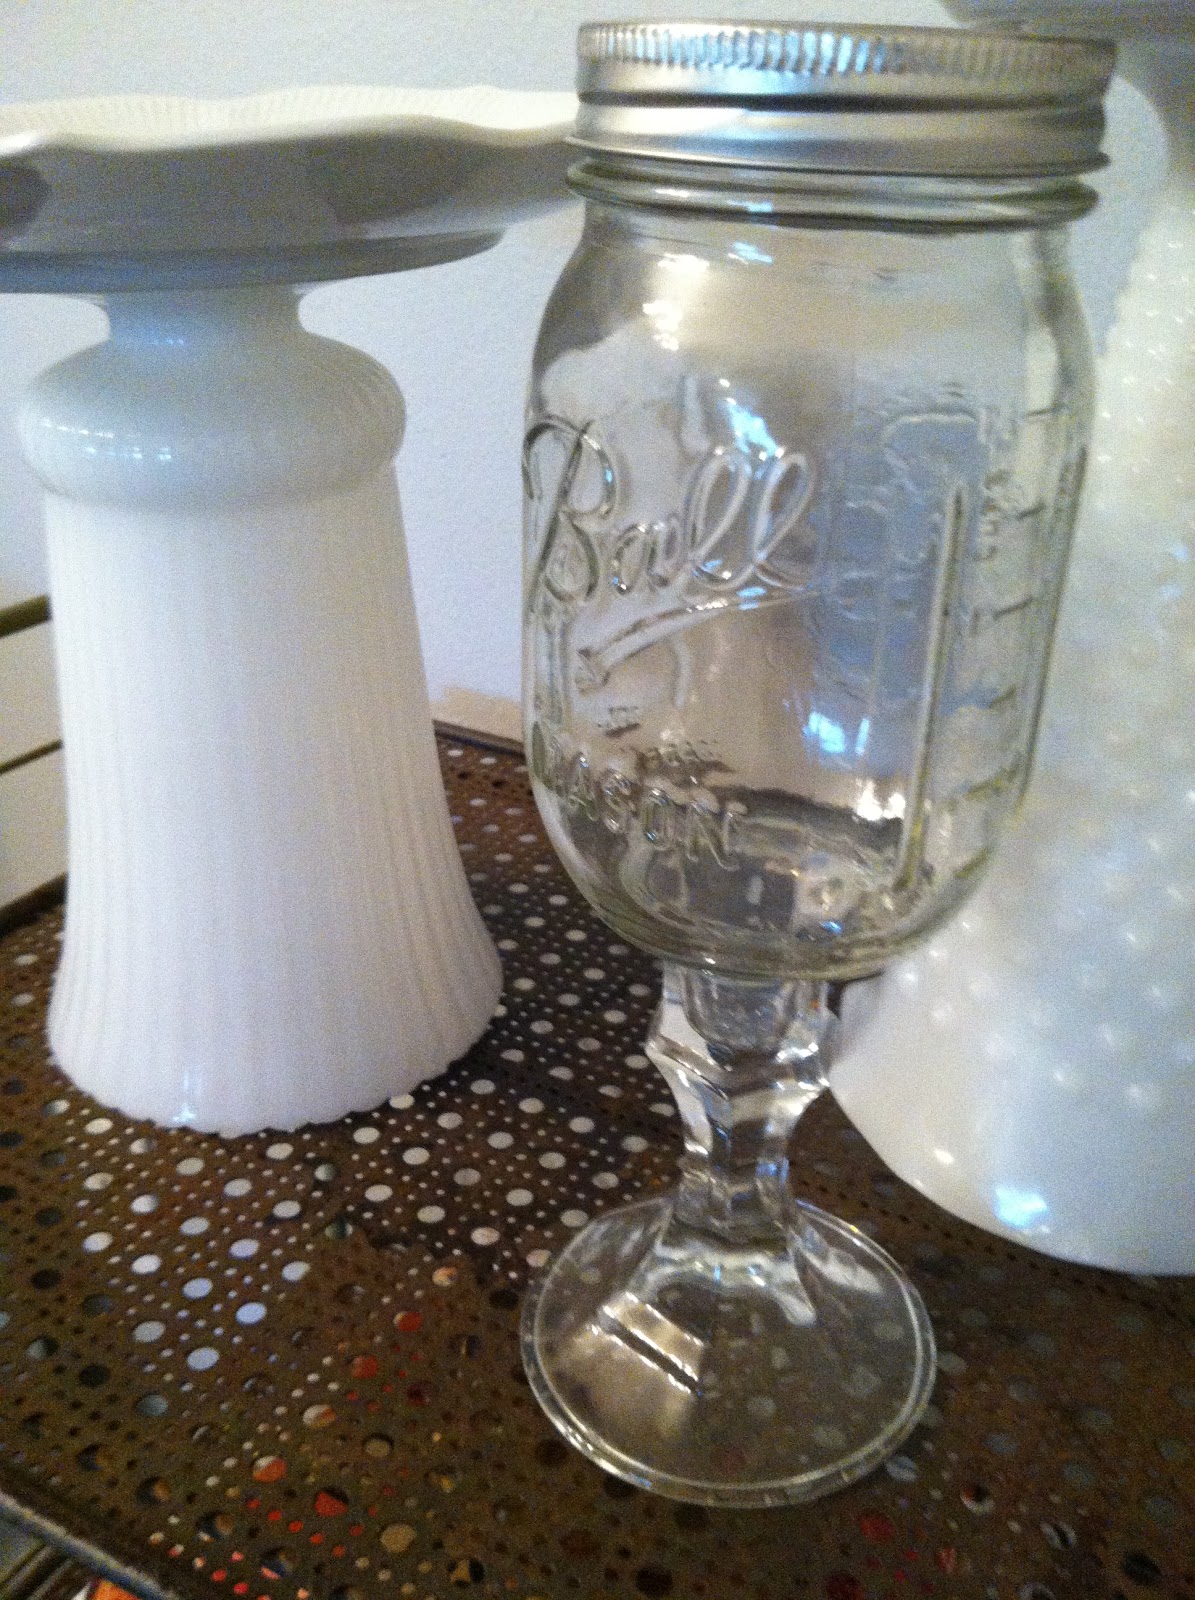
 Here's the cheapest finds of the day.  Pete and I have been on a major duck dynasty kick and we recently watched the episode where they bought a vineyard and drank their failure mallard merlot out of these babies.  I had seem them before but thought, "Ah I could just make those with some candle sticks."  But why make them when someone (selling stuff out of a storage unit) wants to sell it to you for 50 cents?  No glass cutting/melting for me baby.  Lastly, the little owl friend was a last minute impulse I made after wiggling my price down for the chair pictured below.  At 25 cents, I couldn't refuse.
 And here, all you crazy kittens, is the new love of my life.  Marked at $8 but sold for $6, if ere' there were a chair to bring to a deserted island, she'd be the one I'd pick.  Tiffany Blue with almost flawless upholstery, two twin tufted buttons, and mint condition wood can stir just about every emotion of joy in this mama's heart.  Picture me - carrying this over head, Rocky style, (not you Aunt Rock) with little sparrows following my lead... Okay a little dramatic, but you get the idea.  She's a beaut.  We plan to add casters to her four pretty little legs so that she'll be standard table height.  She's sure to be a favorite come dinner party time.
What makes your heart flutter?  Fiesta dinnerware?  Mid-century modern tulip chairs?  Atomic era coffee tables?  Share the goods.  I'll be sure to let you know when we complete the task of furnishing our newly DIYed table.  Six more chairs to go!

Thursday, November 3, 2011

Montana Soup

I created this recipe after visiting Big Sky country, that is the great state of Montana.  One day we visited a local restaurant in Whitefish called "Loula's." I had their southwestern chicken soup as an appetizer, however because I didn't use the exact ingredients, nor did I have their recipe, I renamed it Montana soup because big sky was my inspiration!  Here she blows!

Ingredients:

  • veggie trinity 
    • 1 whole yellow onion, diced 
    • 8 oz sliced celery 
    • 8 oz sliced baby carrots
  • 1 8oz carton fresh portabella mushrooms, sliced
  • 3 bell peppers, (1/2 red, 1/2 green, & 1/2 yellow)
  • 1 whole seriano pepper
  • 3 cloves fresh garlic
  • 3 boneless skinless chicken breasts
  • 22 oz tomato puree
  • 64 oz regular chicken broth
  • paprika
  • oregano
  • red pepper flakes
  • Emeril's southwestern essence seasoning *optional* 
  • salt
  • pepper
Prepare:
  1. Heat large pot on medium high (don't need to grease)
  2. Saute trinity until softened 
  3. Add pinch of salt, pepper, & red pepper flakes + 1 T paprika
  4. Cut chicken a.s.a.p. (as small as possible) or cook whole & then shred
  5. Heat separate saute pan coated with olive oil - add chicken, salt and pepper, 1 T paprika (REMEMBER: SEASON AS YOU GO!)
  6. Cook until almost no pink, a little pinky = okay, it will cook out when added to soup - set aside
  7. Mince/press fresh garlic - add to trinity
  8. Add tomato puree to trinity
  9. Add another pinch of S&P and small pinch crushed red pepper
  10. Prep peppers by removing core and seeds, dice all
  11. CAREFULLY handle seriano, do no touch eyes while handling - be sure to mince and remove all seeds, then WASH HANDS!
  12. Add all peppers to trinity
  13. Add chicken to pot as well
  14. In empty chicken pan, add 2 T butter & mushrooms
  15. Saute mushrooms until softened
  16. Add mushrooms to pot
  17. Stir until all well combined
  18. Add one more pinch of S&P, 1 T paprika, several dashes Emeril's Seasons (if you don't have, use garlic salt)
  19. Add chicken broth and allow slow rolling boil for 10 minutes
  20. Cover and reduce to simmer for 30 min - 1 hour
  21. Service with crusty baguette - you'll need it to cool your mouth down!
This may seem like a lot of steps, but hey I'm a detailed person when it comes to recipes, and the amount of soup you end up with  make this labor of love soup totally worth it. Let me know if you try this out!  My husband raved about it, so I thought if he *being the soup connoisseur that he is* liked it, it must be good enough to share! Bon appetit! 

Thursday, August 25, 2011

Cheese & Bread? I'm in.

I was reading one of my favorite home magazines yesterday when a particular page made my stomach smile.  I have always been a lover of the american classic grilled cheese.  White bread, american cheese, chips & pickle on the side. Yum.  Then I saw these recipes, they upped the ante.  Maybe I'm like, an adult or something, but these just sounded so more amazing (and I don't even like tomatoes or bacon!).  Case and point, we tried out the california style last night and it was TO DIE FOR. I can't wait to try out the other two real soon, like, now.  Recipes & pictures found in this month's addition of REAL SIMPLE.


CALIFORNIA GRILLED CHEESE


Serves 1Hands-On Time: 10m Total Time: 10m


Ingredients

Directions

  1. Melt the butter in a small skillet over medium-low heat. 
  2. Form a sandwich with the bread, cheese, onion, and avocado.
  3. Cook the sandwich, covered, until the bread is toasted and the cheese is melted, 2 to 3 minutes per side.

PESTO AND TOMATO GRILLED CHEESE
Serves 1Hands-On Time: 10m Total Time: 10m


Ingredients

Directions

  1. Melt the butter in a small skillet over medium-low heat. Spread the pesto on 1 slice of the bread and form a sandwich with the cheese and tomato. 
  2. Cook the sandwich, covered, until the bread is toasted and the cheese is melted, 2 to 3 minutes per side.

PEAR AND BACON GRILLED CHEESE
Serves 1Hands-On Time: 10m Total Time: 10m

Ingredients

  • 2 tablespoons unsalted butter
  • 2 tablespoons currant or fig jam
  • slices white sandwich bread
  • slices Cheddar
  • slices cooked bacon
  • 1/4 small pear, thinly sliced

Directions

  1. Melt the butter in a small skillet over medium-low heat. Spread the jam on 1 slice of the bread and form a sandwich with the cheese, bacon, and pear.
  2. Cook the sandwich, covered, until the bread is toasted and the cheese is melted, 2 to 3 minutes per side.

Friday, August 5, 2011

Ah-Rdee-Bah!


Or however you spell that funny sound associated with hispanic heritage..... call me stereotypical it's okay. Anyways, on to the point of this post.  I have never really dabbled in mexican food because I know a lot of people who do it much better than I do - i.e. I can just enjoy their food when they have the husband and I over or when they bring their delicious tacos/enchiladas/taquitos/etc... to church or something.....

Also, my husband is from Southern California.  Not sure if that means anything to you, but having grown up in Santa Ana (if you can't tell by the name, it was predominantly mexican) makes him quite the connoisseur and has always left me quite intimidated.  That is until we happened upon a little mexican food stand (yes those are legal in Florida - if you're local, I'll let you in on the secret) several months ago.  My husband swears to it's authenticity and after having eaten there several times I decided it was time to try to duplicate their staples - soft tacos with cilantro, sweet onion, mozzarella cheese, & lime + homemade guacamole and homemade salsa.  I guess I was feeling pretty bold and decided I might as well go down in flames if I was going to try at all.  Without further ado, here is what I came up with - oh and according to my dear husband, it was a smashing success and I quote "out-did myself."  How's that for a first timer?  I was so happy to watch him eat five, yes five, tacos + chips & salsa..... that in itself is a testament if I do say so myself.

Homemade Salsa Ingredients

  • 2 beef steak tomatoes
  • 1/4-1/2 green jalapeno pepper
  • 1 bunch fresh cilantro
  • 1/4 sweet onion
  • 1/2 fresh lime
  • 1 small clove fresh garlic
  • pinch salt
Prepare:
  1. Dice tomatoes in eighths
  2. Rough chop onion
  3. Rough chop 1 handful cilantro, remove stems
  4. Rough chop 1/4 jalapeno & remove seeds (start with a fourth)
  5. Puree tomatoes, onion, cilantro, jalapeno in blender or food processor
  6. Peel garlic, mash with knife, add to blender/processor
  7. Add pinch of salt and blend again
  8. If you want more heat, add another 1/4 jalapeno & a few seeds
  9. Taste again to make sure all flavor
Homemade Guacamole Ingredients
  • 2 regular sized avocados 
  • 1/2 fresh lime
  • salt
Prepare:
  1. Cut avocados in half - peel & remove pit
  2. Remove seeds from lime, squeeze over avocado
  3. Mash with fork
  4. Salt to taste
The Rest of the Fixings
  • small corn tortillas *MUST BE CORN*
  • mozzarella cheese
  • fresh cilantro - minced
  • fresh lime wedges
  • diced sweet onion
  • tortilla chips
  • shredded grilled chicken - add lime juice at last minute
Prepare Your Taco
  1. Heat corn tortillas in skillet or microwave with damp paper towel
  2. Pile desired amount of chicken on tortilla
  3. Sprinkle mozzarella cheese over chicken
  4. Spoon on homemade salsa & guacamole
  5. Sprinkle fresh cilantro 
  6. Squeeze lime wedge over top
  7. Roll and close - stuff and enjoy
  8. Best enjoyed with chips & salsa on the side
This may sound like a lot of ingredients, but it cost me about 10 dollars , not including chicken since we already had some on hand.  This would be a great meal to prepare a day in advance for a party, all you would have to do is heat the chicken through, heat up the tortillas, and plate the toppings.  Pretty easy but so so tasty and a cinch to prepare.  Let me know if you try it!  I can see it becoming a staple in our house - husband approved. 

Sunday, June 12, 2011

Buffalo Chicken Wraps


   This past week I did something a little daring, a little crazy, some may even go as far as flew off the handle.  Bum bum ba bum.... I tried out a new recipe for the first time, not just on my dearly beloved, but on two unknowing friends.  The result?  Pretty dang exciting... said in a Nacho Libre voice.  I was a little worried with the overwhelming smell of buffalo sauce enveloping the house, but luckily they were a hit!  What can I say?  I live life on the wild side.  AND they were a SINCH to make and super yummy - how's that for refined?  Oh, did I mention cheap?  I mean come. on.  Tortillas, ranch dressing, lettuce, and chicken breast?  Definitely won't break the bank.  So here she blows!  Or rolls.... for that lack of a better word.

Ingredients:

  • 1 extra large flour tortilla per person
  • 1 chicken breast per person (this seemed like a lot to me too, but it worked out with just a little leftover)
  • 2 small heads of romaine, julienned
  • Shredded Mozzarella Cheese
  • Ranch Dressing (we used non-fat to be extra conscientious) 
  • Buffalo Sauce Marinade (we used Ken's, it was on sale)

Prep:

  1. Dice raw chicken into one-inch cubes
  2. Place in marinating dish or glass baking dish.
  3. Pour marinade over top and toss.
  4. Let stand for at least one hour.
  5. DO NOT marinade over night - the acidity will turn the meat into a buffalo ceviche = not good.
  6. Add one cup of flour to marinade and stir well - this should thicken the sauce but not clump it.
  7. Cook in greased skillet on high for 2 minutes.
  8. Reduce heat to medium low, cover and allow to cook for another 10-12 minutes or until all pinkness is cooked out - taste check.
  9. Remove from heat.
  10. Build your wrap!
    1. Open tortilla.
    2. Fill with meat & lettuce.
    3. Sprinkle cheese on top.
    4. Add ranch dressing or pour on the side to dip.
    5. Enjoy! 
*Optional: 
  • add diced tomatoes for more color and flavor building (we're tomato haters)
  • serve on spinach, tomato or whole wheat tortillas for a more healthy choice
  • double batter and deep fry chicken for a more crunchy texture

Wednesday, March 23, 2011

Pillows of Chicken + Couscous

If you have read any of my past recipe posts, you probably know that most of my recipes are not exactly what you'd call "waistline friendly."  Why you ask?  Because I like to post recipes for special occasions or recipes that are simply special themselves and this dish is no different.  It is delicious, fattening, and richly flavored.  So, sorry... but not really.

Ingredients:

  • 4 whole boneless, skinless chicken breasts
  • 1 T butter or olive oil
  • 1 quart heavy whipping cream (you won't use all of it)
  • 8-12 oz. fine parmesan cheese (as in, finely grated)
  • 1/2 cup fresh parsley
  • lemon juice
  • salt & pepper
  • flour
  • two boxes of preferred Couscous
Prepare:
  1. Heat non-stick skillet on high with butter/olive oil coating the pan.
  2. Trim chicken and halve, sprinkle with lemon juice and dredge in flour.
  3. Sear chicken on both sides until golden brown, do not cook all the way through.
  4. Snuggly place chicken in baking dish (glass preferred) and preheat oven to 450.
  5. Pour cream over chicken enough to cover almost completely; adjust chicken as necessary.
  6. Generously sprinkle parmesan cheese and parsley on top.
  7. Bake at 450 for 15-20 minutes (mine actually took 25 minutes)
  8. While chicken is baking prepare couscous as noted on the box.  (I use Near East Couscous Mix with Toasted Pine Nuts) Be sure to follow the directions carefully as couscous can be temperamental and turn to mush if otherwise prepared. 
Here she looks going into the oven:
 And here she looks plated!


It is absolutely wonderful!  It might not looks exactly the picture above, in fact I doubt it will because that picture took forever, but it will taste the same I assure you.  You really can't mess it up, really!  Although it is a messy plate in reality, it's taste is nothing short of rich, elegant, and full bodied flavors!

P.S.
If you're wondering what the orange looking pieces are in the top photo you can also ad carrots, mushrooms, or other creamy vegetables to add more pops of interest.

Saturday, January 8, 2011

Fresh Herbs, Year Round.

Ever had problems keeping your fresh-cut herbs fresh in the fridge?  Or even keeping your fresh herbs alive if they're planted?  I have found this solution that works like a charm, and allows you to have fresh herbs year round, and no I don't dry them out.  Although that is an option, I like this one better for flavor and for freshness.  This solution comes from the kitchen of Ina Garten, the Barefoot Contessa herself - love her.  So here's how to do it in two easy steps!  
   
Fresh Herb Ice Cubes

  1. Roughly chop same kind of herb and distribute into ice cubes.  Do not use food processor because herbs will become to watery and only combine herbs if you plan to use them simultaneously in your meal.
  2. Freeze, date, and pop out into separate container for easy use. In Ina's words, "How easy is that?"


Monday, November 29, 2010

Rut-Roe

This past Thursday, while baking with my Mom all day, she discovered a little slip up on one of my recipes, and boy am I glad she did before the dish was baked!  For those of you who tried to make the Broccoli Vee Casserole, I hope you figured out to cook the broccoli before hand as directed by the bag/box.  I forgot to include this fine little detail and apologize profusely if you did not cook yours first!  Hopefully no one ended up eating half-way cooked crunchy broccoli, and if you did I am so very sorry! Then again, not many people read this blog, so hopefully everyone in the blogosphere ended up okay!  Anyways, how was everyone's holiday break?  I worked all weekend, being employed at the mall, so it was pretty much a nightmare - but hey the time sure went by fast!

Wednesday, November 24, 2010

How To Brine A Turkey

I'll be honest with you, I didn't know what the word "brine" meant either.  I am by no means a Julia Child when it comes to cooking so don't be intimidated in the least.  This will only be my second turkey, so we're in this together.  When I saw this recipe on food network, I thought, man that looks good.  Who would have ever thought to marinate a turkey?  Not me.  Chicken, beef, sure - but turkey? Brilliant!  So, brine, by definition means:
brine [braɪn]


noun
1. (Cookery) a strong solution of salt and water, used for salting and pickling meats, etc
2. (Earth Sciences / Physical Geography) the sea or its water
3. (Chemistry / Elements & Compounds) Chem
a.  a concentrated solution of sodium chloride in water
b.  any solution of a salt in water a potassium chloride brine
verb
(tr) to soak in or treat with brine

Now again, this may seem daunting, but if the outcome is as good as all the reviews say, it's gotta be worth it.  We'll see two days from now & I'll let you know how it goes, but for now, here's what you'll need to get Birdie started.


Ingredients:

  • 24 lb. turkey 
    • (I realize this is enormous, so just halve things down if you get a smaller guy)
  • 5 sweet onions
  • 10 cloves fresh garlic
  • 64 oz. vegetable broth
  • 64 oz. apple juice
  • 192 oz. water 
    • (i.e. refill the apple juice container three times)
  • 1 bunch fresh rosemary 
    • (by bunch, I mean, I went outside and picked a bunch)
  • 1 bunch fresh thyme
  • 1 bunch fresh basil 
  • SALT SALT SALT
  • Pepper
  • 2 tablespoons "Savory" seasoning
  • Ice
Prepare
  • Get turkey out of bag and de-gut. Yuck yuck yuck.  I'll admit, my Dad helped me with this part last year, but I was left to my own devices this time around - bummer.
  • Rinse well inside and out.  Pat dry.
  • Carefully drop into plastic container big enough + lots of broth.  I got a "74 lb" one if that helps.
  • Add all veg broth, juice, and half of water.
  • Peel onions and quarter. Add to container.
  • Peel garlic, smash to release flavor & add to container.  It should look like this so far.


  • Next get your herbs together.  Personally, I used fresh because that what's I had on hand, and let's be honest, it just looks good. Pictured below: thyme.  
  • Pick off stems, (we don't want those in the jacuzzi) bruise, tear, chop. Don't skip this step or your herbs will do nothing for you!
  • Add to turkey box along with savory season, a couple handfuls of salt and a couple dashes of pepper.  DON'T BE SCARED TO SEASON!  Think about how big a bird this is, (no pun intended big bird) and how much water there is + the sweet apple juice!  Do not by shy folks!
  • Top with remaining 1 1/2 containers water and give the turkey a good dunk.  Try to stuff some of the onions & garlic underneath him and try to mix around him without splashing too much. He should look like this now:
  • Now doesn't that look pretty good?  I think so.  To finish add enough ice to fill in the broth spots.  I would guess 4-6 cups.  You want to keep him chilled.
  • Next, cover, put in fridge and let it soak over night, like so:
  • If all goes well this turkey should be falling off the bone after being cooked. 
  • Oh by the way, about that.  When turkey day arrives and you are ready to get the bird cooking, pull him out of his bath and pat dry. Be sure his insides are clear of marinade as well.  Discard marinade & contents - it is contaminated now.
  • Fill bird with 1-2 quarted onions, 1 orange, & celery. 
  • Make herb butter or purchase and rub underneath the skin as seen in handy video (click here).
  • Next, put turkey in roasting bag and follow directions according to weight.  For this twenty-four pounder it will take about 3 hours to cook. Although this seems quick, brining your turkey will shorten cook time, not to mention the bag.
  • Once cooking is finished let turkey sit for at least 15 minutes, pref a 30 in the bag!  This will allow the juices to redistribute and remain in the bird - a little trick I've learned from my awesome father-in-law i.e. seasoned butcher. 
  • Save drippings to make gravy, as seen in this handy video (click here).
    • I use water instead of broth and nix the wine and a fine mesh strainer will do to separate.
If you think of me tomorrow, say a little prayer! I hope that this guy turns out well and starts a new tradition of moist & flavorful turkey! Happy Thanksgiving everyone!


The Husband Diets.

Lately my husband has been on a health kick and when he is there is always a remarkable amount of lettuce in the fridge!  I figured he must be getting pretty tired of manatee's "meat," so I decided to make him a special, but healthy alternative for those munchie hours that all dieters endure! Introducing Kendi's Homemade Trail Mix!  Now these are Pete's personal faves. If you don't like any of these ingredients swap it out for something similar and you will have you very own custom trail mix!  Here's the ingredients I tend to swoon towards.

The Stuff:

  • 8 oz. roasted peanuts
  • 16 oz. can pecans (I put some aside since it's Pete's fav)
  • 2 small bags of craisans
  • 1/2 tall can raisins
  • 1 8-10 oz. can Dried Apricot
  • 1/4 bag Ghirardelli Mini White Choc Chips
  • 1/2 bag Trader Joes Honey Sesame Sticks
The only prepping for these ingredients includes cutting the apricots into halves or thirds.  Keep in mind, everything should be bite size if you swap out an ingredient.  Other than that, pour everything into a large mixing bowl and combine.  I poured mine into a cute little (lidded) glass container and set it out for him, while storing the extra in a huge tupperware container in the pantry.  Any body else getting a head start on their diets before the holidays?  Props to you guys! I'm afraid I don't have the will or self control to diet, however I think I will be joining in on the exercising once I get some fresh air in my beach cruiser.

Monday, November 22, 2010

Gimme Your Tots!

For my last birthday, my dearest husband bought me a TON of my favorite food network stars' DVD series.  One of my favorites, who is a little lesser known, is Anne Burrell.  She is hilarious and if you don't know who she is, think about the lady with the crazy bleach blonde pixie hair, whit to kill, and whom often speaks in a growling voice.  Ring any bells?  Okay - just google it.  Anyways, this recipe was on one of the DVDs that I received and although I'm not a huge mash-tater fan, this recipe includes heavy cream so I can only imagine it tasting pretty close to heavenly.  Again, this is for THANKSGIVING, the holiday that exhorts gluttony so just roll with it and repent later.


Ingredients

  • 2 pounds Yukon gold potatoes, washed and quartered
  • 4 cloves garlic
  • Kosher salt
  • 1 1/2 cups heavy cream, warm
  • 1 stick cold butter, cut into 9 pats

Directions

  1. Place the potatoes and garlic in a large sauce pan. Cover with 1 to 2 inches cold water and season generously with salt. The water should taste like the sea. TASTE IT! If the water is under seasoned at this point it will be hard to have a well seasoned end product. 
  2. Bring the pot of water to a boil and cook until the potatoes are fork-tender, about 20 to 25 minutes. 
  3. Drain the potatoes and garlic well and pass through a food-mill or ricer. DO NOT use a food processor or blender. It will result in a very sticky and rubbery end product.
  4. While passing the potatoes, bring the heavy cream to a boil in a small saucepan. Once the cream has come to a boil remove from the heat.
  5. While the potatoes are still hot add 1/3 of the cream and butter and stir vigorously into the potatoes.
  6. Repeat this process 2 more times until all of the cream and butter has incorporated. 
  7. Taste the potatoes for seasoning and add salt, if needed. 
  8. Serve immediately or cover with foil and keep warm in an oven on low heat.

Friday, November 19, 2010

The "Green Stuff"

This recipe hales from the great state of Minnesota i.e. my mother-in-law.  She is a born and raised Midwesterner and knows all about the word "salad."  Now to me, salad means things like lettuce & croutons but trust me, as any Minnesotan and they'll tell you differently.  If this seems confusing to you then you need to see the movie "New In Town."  However, if you haven't acquainted yourself with the, hmm, culture, you are missing out - Don't ya know?  So onto this beloved recipe which I'd say is a GREAT substitute for lettuce and croutons any day of the week - it is green right?

Randall Scale:
Grocery...............$7-9
Skill Rating..........a blind person could make it (no offense)
Serving Size........10-15 (this recipe is doubled)
Prep time.............30 seconds + refrigeration over night


Ingredients:
  • 2 boxes JELLO Pistachio Pudding
  • 2 tubs 8 oz cool whip
  • 20 oz can crush pineapple in juice (not syrup)
  • 3 cup mini marsh mellows 
  • 1/2 cup finely chopped walnuts *optional*
Prepare:
  1. Mix all dry JELLO mix with pineapple - combine well.
  2. Add walnuts if you so desire, we never add nuts but if you're feeling nutty...haha.
  3. Add marsh, combine again.
  4. Fold in cool whip.  Be sure not to over mix or it won't hold.
  5. Pour into serving dish or mold and allow to sit in fridge overnight.  
  6. Serve WITH main course - yes you heard me right. I LOVE THE MIDWEST!

Thursday, November 18, 2010

Broccoli & Cheese? Yes Please.

Good Evening Ladies & Gents!  This here is the kick off for my Thanksgiving recipe series - I do hope you enjoy them and dare I say, try them out this upcoming turkey day!  The first star to enter the spotlight is the daring and rather, unusual Broccoli Vee Casserole.  Now - know this, I don't eat broccoli any other day of the year but this recipe makes me want to swim in it - props to my Mom as she is the brilliant mastermind behind hiding good things is bad food (that will make more sense once you see the recipe). Now before you jump all over my velveeta, yes, you use velveeta in this recipe, you have to try it.  It doesn't taste like velveeta when used in this recipe because all you can taste is buttery ritz cracker goodness.  Here we go!


Randall Scale:
Grocery......................$12.00
Skill Rating..................Kindergarten Friendly
Serving Size................10-12 peeps
Prep Time...................30-40 minutes tops


Ingredients:

  • 1 large bag frozen broccoli florets 
  • 1 medium brick Velveeta Cheese
  • 1/2 stick-a-butta
  • 1-2 sleeves Ritz Crackers
  • 1 casserole dish (somewhere around 12 by 12)
Prepare:
  1. Open cheese. Now, again, I know Velveeta is the king of all kings of processed cheese - heck you get it OFF THE SHELF next to the pasta sauce.  If you just can't bear to use dear old V then substitute this with a nice melty cheese like gouda or gruyere.
  2. Cube into small 1/2 inch bites - pop a few if you are so inclined.
  3. Remove Ritz sleeve numero uno and empty contents into gallon sized ziplock.  Bang bang bang til its nice and crumbly, but not too fine - a good time for the kids to help.
  4. Take broccoli out of freezer and pour into greased casserole dish or corning wear.
  5. Cover broccoli with cubed cheese like it's your number one job. Mmm mmm good.  
  6. Cover cheese with Ritzy ditzy crumbs, if you run out of crumbs enlist the kid's help again and proceed to cover completely.
  7. Remove half stick of butter from fridge.  Melt in microwave and pour over crackers - this keeps getting better and better, my mouth is watering!
  8. Preheat oven to 350-375 degrees.  Cook for 15-18 minutes.  Watch.  When finished, the crackers should be golden brown and crispy and the cheese yummily melted.  If not put back into oven until crispiness and meltiness is achieved.
  9. ENJOY & HAVE SECONDS!